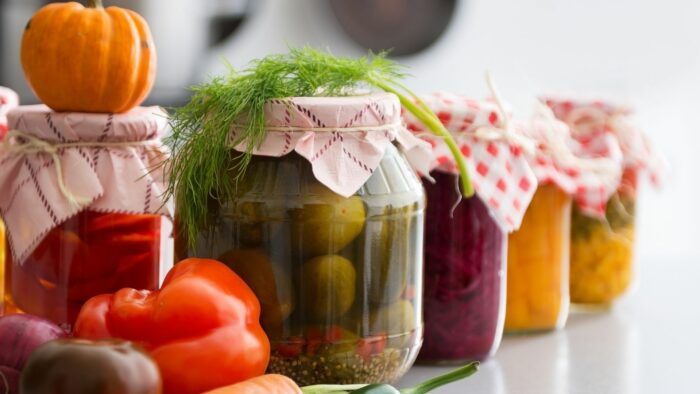
If you’ve been considering fermentation but are unsure where to start, lacto-fermentation is a simple, quick way to pickle all your favorite PA veggies and fruits or even make some authentic sauerkraut and kimchi!
We also know that the thought of fermentation of any kind tends to make people a bit nervous. How can you do so safely to make sure you and your family don’t get sick? Not to worry, the lacto-fermentation process—when done correctly and according to recipe—results in healthy, flavorful pickled goodness and prevents harmful bacteria from taking root.
To help you get started, we’ve created a comprehensive lacto-fermentation guide to teach you how it works and how to do it yourself. Plus, we’ve included three easy recipes for you to try!
What is Lacto-fermentation?
Lacto-fermentation is a common form of pickling vegetables. This simple fermentation process requires only salt (lots of it!), your favorite veggies (we’ll get into which ones are best), and water. Many love lacto-fermentation because it is so easy and requires no canning or fancy equipment.
And if you’re watching your salt intake, there are alternative methods without added salt, too! We’ll touch on those further down.
Is Lacto-fermentation safe?
As mentioned earlier, safety is a primary concern with any method of preserving food. As long as you prepare your ferments properly, your pickles will be safe and delicious. Much of this relies on using the correct salt-to-water ratios for the brine, so use the exact amount of salt your recipe calls for.
It’s also critical that you allow the veggies to ferment long enough to allow the fermentation to fully take place. You should be checking your pickles daily. If they smell bad (think rotting broccoli or lettuce), throw them out.
When fermenting for five days or more, mold can sometimes start to form on the surface of the brine. Have no fear! You can simply skim this off the top and everything underneath will still be safe to eat. There are also a few things you can do to prevent mold:
- Stir the brine surface daily, push down any veggies that are sticking out of the brine, or just close the lid tightly and shake it up.
- Use a jar with an airlock lid, which prevents air from entering the jar and keeps mold at bay.
- Use a fermentation crock with a water seal—an extra secure airtight seal!
How does it work?
- Harmful bacteria can’t tolerate salt, but the healthy bacteria (like in yogurt) can
- Lacto-fermentation eliminates bad bacteria, then lets the good ones thrive
- The healthy bacteria are called Lactobacillus
- Used to produce fermented foods
- Convert natural sugars in fruits and vegetables into lactic acid
- Lactic acid: Natural preservative that helps fight bad bacteria and preserves flavor, texture, and nutrients of food
- Promotes a healthier digestive system and speedy yeast infection recovery; believed to have anti-inflammatory properties that may be useful in preventing certain cancers
Harmful bacteria can’t tolerate salt, but the healthy bacteria (like those found in yogurt) can. Lacto-fermentation eliminates the bad bacteria and makes way for all the great probiotics to thrive.
These healthy guys are called Lactobacillus, several species of which are used to produce fermented foods. They convert natural sugars in fruits and vegetables into lactic acid, a natural preservative that helps fight bad bacteria and preserves the flavor, texture, and nutrients of the food. Lactobacillus also have several health benefits, as they:
- Promote a healthier digestive system.
- Aid in speedy yeast infection recovery.
- Are believed to have anti-inflammatory properties that may help prevent certain types of cancer.
Salt Brine Method
Below are the general steps for the standard salt brine lacto-fermentation process.
- Stage 1: Submerge your veggies in a brine that is salty enough to kill off harmful bacteria.
- Stage 2: The Lactobacillus start converting lactose and other sugars present in food into lactic acid, creating an acidic environment that preserves the veggies, keeps out the nasty bacteria, and allows probiotics to thrive. This process results in that distinctive tangy flavor.
Tips for the Lacto-fermentation Process
- Use filtered water to avoid chlorine and chemicals that can interfere with the fermentation process.
- Don’t worry about sterilization, just make sure your jar is very clean.
- Turn the jar on its side, then load the veggies to ensure they stand up straight.
- Pack your veggies in the jar as tightly as possible, until you can’t fit anymore, to ensure they stay submerged in the brine and don’t float up out of it.
- Opt for kosher or other non-iodized salt and always avoid table salt, as iodine could negatively affect your ferment.
- Add onion, garlic, dill or bay leaves (fresh or dried), or other herbs for flavor-packed pickles.
- Spice up your pickles by adding one or two small chili peppers.
- Avoid cooking your pickled vegetables, which will kill the healthy probiotics. Instead, add them as-is over grains, like tabbouleh or quinoa salads.
Alternative Methods
Are you cutting back on your salt consumption? Try one of these techniques that don’t require added salt. Just keep in mind that lacto-fermentation without added salt requires the introduction of living, healthy bacteria.
Option 1: Whey
- Add 1 tbsp of whey to each pint of food you want to ferment.
- Add enough water to cover the food.
- Make your whey by straining yogurt through a cloth filter or several layers of cheesecloth—the separated liquid is the whey!
Option 2: Brine from a Previous Fermentation
- Add 1 tbsp of brine from a previous ferment that was never heat-processed (to ensure it contains those healthy bacteria) to each pint of food you want to ferment.
- Add enough water to cover the food.
After either option, proceed with your lacto-fermentation recipe the same way as if you’d added salt.
Shelf Life of Lacto-fermented Foods
Lacto-fermentation is not used for long-term preservation like canning, which calls for a form of sterilization to prevent botulism and is intended to preserve food for long periods, often six months or more.
Many fermented fruits and vegetables have a shelf life of two months or more. One perk of lacto-fermented foods is that their flavors develop and they become more acidic over time. This means you can let it reach your desired level of fermentation and enjoy it before the end of its shelf life.
Enjoy PA Veggies Year-round
Lacto-fermentation is a great way to enjoy many PA veggies year-round! Firm vegetables make the best pickles, like:
- Beets
- Turnips
- Carrots
- Green beans
- Snap peas
- Cauliflower
- Radishes
- Garlic
- Zucchini
Keep in mind that soft vegetables can be more challenging to pickle. Also beware of “gassy” veggies, like broccoli and Brussels sprouts, which give off a strong odor. Mix them with other veggies to mitigate some of that odor.
Now that you understand how it all works, you can make your own lacto-fermentation pickles!
3 Easy Lacto-fermentation Recipes
Are you a first-time fermenter? Try these three easy lacto-fermentation recipes featuring three summer PA veggie favorites to enjoy delicious, nutritious pickles that keep for months.
Below are three great beginner lacto-fermentation recipes from Leda Meredith, food writer and certified botanist, and originally appeared on The Spruce Eats. These basic recipes leave lots of room for you to experiment with your favorite flavors—so don’t be afraid to add some aromatics and spices to your ferments.
Lacto-Fermented Green Beans (a.k.a. Dilly Beans)
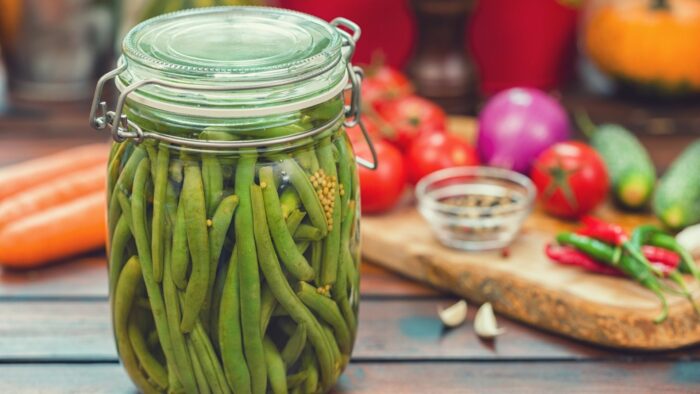
Fermented green beans are a highly popular classic pickle recipe. And since our healthy green friends are in season from summer through fall, you can enjoy dilly beans for days (or months)!
Ingredients & Supplies
- 1 ½ tbsp kosher or other non-iodized salt
- 3 C filtered water
- 2 lbs PA green beans
- 1 clean glass quart jar
- 1 large measuring cup
Instructions
- In a measuring cup, stir the salt in the filtered water until dissolved.
- Wash the green beans and snap off the stem ends and tips.
- Place a clean glass quart jar on its side, then load the beans in tightly until there is no more room. Note that the green beans will shrink slightly as they ferment, but packing them in tightly ensures they will stay immersed in the brine.
- Once the jar is full, set it upright. Pour the salt brine over the green beans, ensuring they are completely covered by brine. Cover the jar loosely with a lid.
- Place the jar on a small plate to catch overflow that may happen during active fermentation. Leave the jar at room temperature for 24 to 48 hours.
- After the first 24 hours, remove the lid and check on your ferment. You should start to see some bubbles and it will begin to develop a mild, refreshingly sour smell (like a light version of sauerkraut).
- Once you see and smell signs that the green beans are actively fermenting, transfer the jar to the door of the refrigerator. This is the warmest part of the refrigerator, but still cooler than room temperature—perfect for green beans to continue to slowly ferment.
- Enjoy your dilly beans 1 to 2 weeks after making them (or when they reach your desired level of fermentation)! If you plan to keep them for more than a month, store the jar in a cooler part of your refrigerator (i.e., one of the central shelves rather than the door).
Pro Tip: Add some variation and color by using yellow wax beans or a combination of both green beans and wax beans.
Lacto-Fermented Carrots
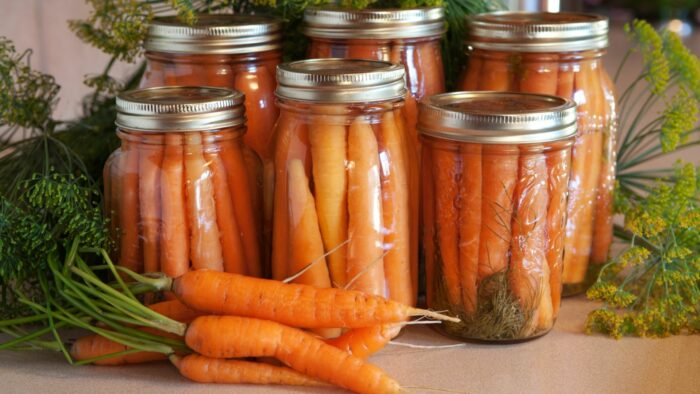
We all know the many health benefits of carrots, but did you know you can make them delectable and last for weeks (or even months) without having to cook them? This lacto-fermented carrot recipe is similar to the dilly beans recipe: simple and quick, with plenty of possibilities for flavor!
Ingredients & Supplies
- 2 tsp kosher or other non-iodized salt
- 3 C filtered water
- 1 ½ lbs PA carrots
- 2 clean glass pint jars
- 1 large measuring cup
Instructions
- In the measuring cup, stir the salt in the filtered water until dissolved.
- Wash the carrots, cut off their ends and tips, and peel them.
- Cut the carrots short enough to fit into a pint jar with a little headspace above.
- Cut the carrots lengthwise into quarters.
- Place your two clean glass pint jars on their sides and pack the carrots in tightly, until you can fit no more carrots.
- Once the jars are full, set them upright. Pour the salt brine over the carrots, ensuring they are completely submerged in the brine. Cover the jars loosely with the lids.
- Place the jars on small plates to catch any overflow that may occur during active fermentation. Leave the jars at room temperature for 24 to 48 hours.
- After the first 24 hours, remove the lids and check on your ferment. You should start to see some bubbles and smell a mild, refreshingly sour scent.
- Once you see and smell the signs that the carrots are actively fermenting, transfer the jars to the door of your refrigerator so they can keep slowly fermenting.
- Enjoy your pickled carrots 1 to 2 weeks after making them (or when they reach your desired level of fermentation). If you plan to store them for more than a month, move the jars to a cooler part of your refrigerator, like one of the central shelves.
Pro Tip: Mix it up with a combination of white, purple, and orange carrots for a healthy, colorful snack!
Red Cabbage Sauerkraut
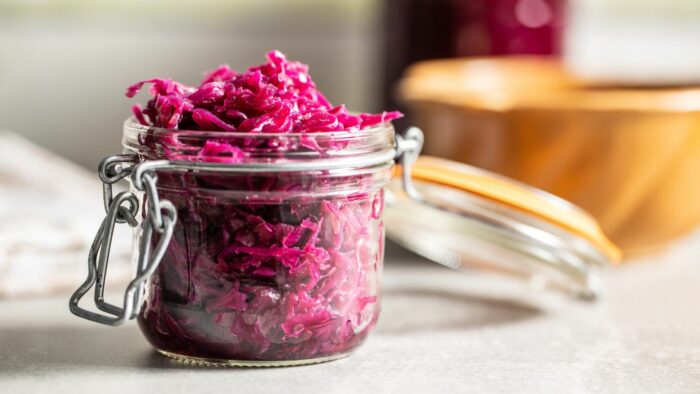
Have you always wanted to make your own authentic sauerkraut? Now you can with the help of this easy red cabbage sauerkraut recipe! This vibrant and healthy side goes great with apples, a pork roast, on sandwiches, and more.
Ingredients & Supplies
- 1 head PA red cabbage
- 4 C filtered water
- 1 tbsp kosher or other non-iodized salt
- 1 tsp caraway seeds
- 8 to 10 dried juniper berries
- 3 clean pint jars
- 1 large measuring cup
Instructions
- Cut the cabbage in half. Cut out the thick core and stem end and compost or discard them.
- Thinly slice the cabbage into shreds or small pieces (think coleslaw).
- Loosely pack the sliced cabbage into clean glass jars, sprinkling in some of the caraway seeds and juniper berries as you fill the jars.
- In the measuring cup, stir the salt in the filtered water until dissolved.
- Pour the salt brine over the cabbage and spices. Gently press down on the cabbage and spices to release any air bubbles and to submerge them in the brine. Cover the jars loosely with the lids.
- Place the jars on small plates to catch any overflow that may happen once fermentation becomes active.
- Leave the jars at room temperature for 3 days. During this time, remove the covers at least once a day and check to see that the veggies are still submerged in the brine (add extra brine if necessary). You should start to see the bubbles on top, indicating that fermentation has begun.
- By the end of the 3 days, your sauerkraut should have a clean, slightly sour smell and taste. Transfer the jars to the refrigerator.
- Wait at least 5 more days for the flavor of your red cabbage sauerkraut to develop. While sauerkraut will keep in the refrigerator for at least 6 months, it is best enjoyed within 3 months. After this time, it tends to lose some of its crispness.
Pro Tips:
- Try this recipe with green cabbage or a combination of green and red cabbage.
- Add mustard seeds, fennel seeds, dill, garlic, or fresh ginger for more flavor.
- Swap out about a quarter of the cabbage for shredded carrots and/or beets.
We hope this lacto-fermentation guide and the tasty recipes above are plenty of inspiration to get you started on your own easy pickling process. For more ideas on how to get creative during PA Produce Month, download our FREE cookbook—and don’t forget to support your local producers!